
Linking tasks in MS Project using Clipboard Filter
Linking Tasks
Linking tasks isn't hard in a stand-alone schedule. It's as easy as finding the ID or UniqueID and typing that number into the Predecessor/Successor field or the Unique ID Predecessor/Successor field. What can be tricky is linking tasks in a Master schedule. This is because you have to identify the Subproject before you identify the ID or UniqueID. Depending on whether you're using Project Server/Project Online or your file system, what you put in front of the ID/UID is different.
- Project Server/Project Online will need something like this: "<>\Project Name\ID"
- A Master that links to multiple files will need something like this: "\\FileServerName\Path\Path\Path\Path\Project Name.mpp\ID"
This makes linking between projects not so straight forward.
There is a built-in way to link tasks in MS Project. You can select a task, hold down Ctrl, then select another task. The order in which you select tasks does matter. The first task(s) you select will be the predecessor and the second task(s) will be the successor. Once your tasks are selected, under the Task menu, select Link The Selected Tasks or use the shortcut key combination (Ctrl+F2). An image of this is below.
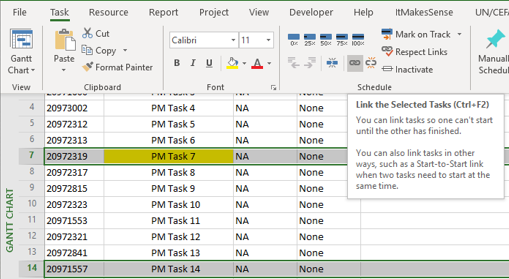
The problem with this is that tasks that need to be linked from Subproject to Subproject are seldom close enough for holding down Ctrl to be feasible. There are built in solutions to this as well. You can filter the two tasks you want to link. An example of this filter is below.

This could put the predecessor below your desired successor so make sure you click the predecessor first before holding down Ctrl to select the successor.
Another possible solution is to somehow identify cross project links and filter them whenever needed but this seems like a waste of a custom field. Yet another way to filter links is to put some kind of identifier in front of the Task Name. (CPL: or EXT:, etc...) No matter what the method is there's usually several steps you need to take to get there, especially if the order is important to you. This would require you to filter then sort. You might also want to remove indents for readability and project summary tasks to avoid the possibility of creating a summary link (A DCMA audit finding).
As an alternative you could use the Clipboard Filter in the ItMakesSense add-in. I'm going to use Notepad as an example but you could use Outlook, MS Word, MS Excel, or any text editor for this. In Notepad, list the tasks you want to see in the order you want to see them in MS Project (You could copy and paste straight from MS Project into Notepad). Separate each Unique ID by a carriage return (Enter). Note: In MS Excel, this would go to the next row. Below is a .gif of this.

Remember, Show All under the ItMakesSense will remove everything Clipboard Filter did and select the active task in the current view. Below is list of actions Clipboard Filter took to display the tasks from Notepad in the exact order they are shown.
- Show All creates a blank slate, removing all filters, groups, and outlines
- Parses the Clipboard to find valid entries, duplicates will be ignored
- Clears the current values in the Number Field (Makes all values not 0 equal 0)
- Enters an incremented value into the Writable Number field from Application Settings